What is Synology DS220+?
It doesn’t matter if you are a severe gamer, professional or casual computer user because you are probably thinking about the importance of your data. After all, they must always be safe and always available. I have already written about storing data on your computer, but I want to raise the bar to a higher level.
One of the more modern ways to store your favorite games, pictures, music, videos, and other vital data is on one of the popular cloud services. Many users avoid cloud storage due to the importance and confidentiality of data. The story is different in a larger business environment, but we talk about the average users in a small local area network (LAN).
The best and most secure solution for such users is storing and sharing data within the local network. You can use NAS devices (Network Attached Storage) for this purpose, and here I will present an interesting one from the Sinology label DS220+.
Table of Contents
Synology DS220+ NAS

|
|
Hardware
The DS220+ NAS is a potent device intended for demanding home users and small offices. Compared to the older DS218+ model with the Intel Celeron dual-core J3355 at 2GHz, DS220+ introduces a newer Celeron J4025. Intel’s new dual-core J4025 runs at 2GHz with up to 2.9 GHz turbo mode.
Synology has installed 2GB of DDR4 RAM in this model, and you can expand that capacity to 6GB with another SO-DIMM slot. If it’s a business environment with many clients, it would be good to consider expanding the system memory.
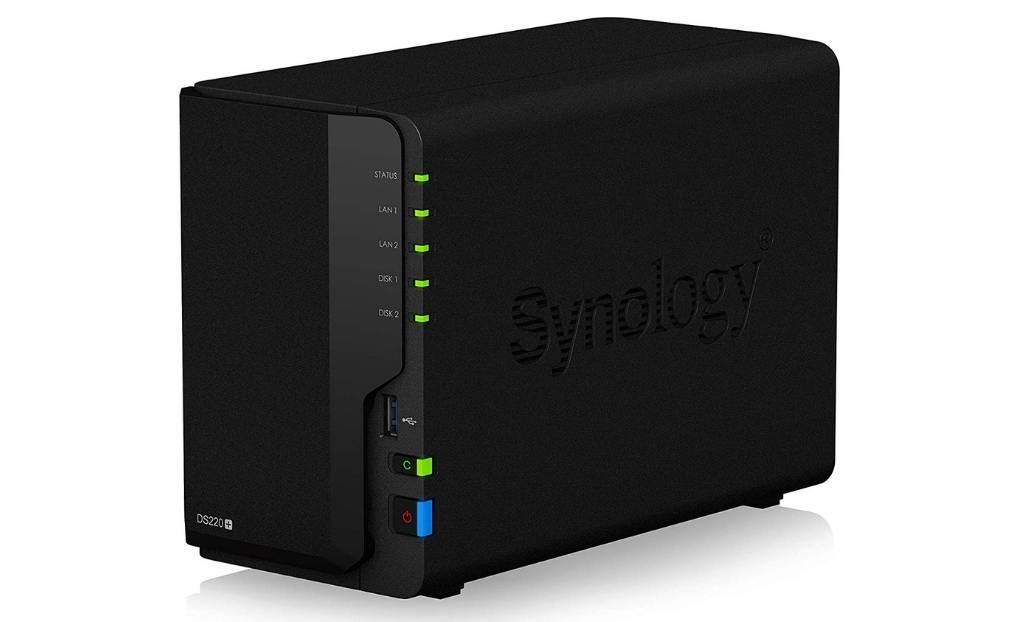
DS220+ Front
You can notice that you don’t need to disassemble the case to install the hard drives. You have to take off the front plastic mask without tools, and you will immediately see two drawers for storing discs. Synology has simplified the whole procedure a lot. You can easily pull the trays out of the case to put the hard drives. Return the filled drawers, and the entire installation of the discs is complete in a few minutes. Initially, drawers receive 3.5″ hard drives. You can also use 2.5 ” HDD or SSD devices with the appropriate adapter.

The maximum provided capacity is 32 TB, which is quite enough for the target group of users. If 32TB is low, you can expand the DS220+ via two USB 3.0 ports to get a maximum storage size of 108 TB. The default NAS setting is a RAID 1 system where the same data is written to both disks for security reasons. In case of failure of one disk, the other will contain identical data.
From the front of the device, you can see 5 LEDs on the right edge of the case. One determines the device’s status, two LEDs are for network connection, and two are for disks. Also on the front is a button to turn on/off the NAS with LED status and a button for USB copying. There’s one USB 3.0 Type-A port on the front of the NAS and the other on the back.
DS220+ Back
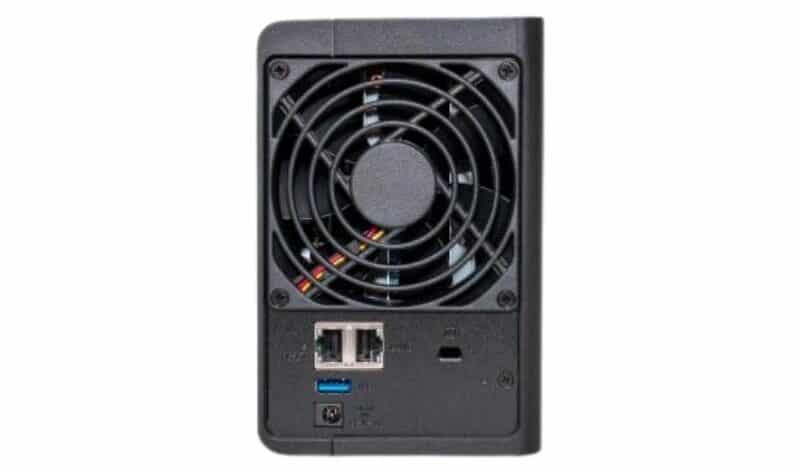
We can see a cooling fan, two gigabit LAN ports, a reset button, Kensington Lock, and another USB 3.0 port. The two-gigabit LAN ports have a dual function:
- The first is link aggregation to increase the bandwidth over two parallel connections.
- Another LAN feature is failover. If the primary LAN connection fails, the NAS will continue to operate over the secondary.
Software
You can use the DS220+ as a web server to store important data, home multimedia, etc. Synology reports up to 17% performance improvements over the older DS218+. The new version of NAS is better at indexing smaller files and has improved the response of the database and PHP itself (if you use NAS as a web server).
You can access the DS220+ in two ways, via the web interface or a mobile phone. The first step is to install DSM (Disk Station Manager), which may take some time, so be patient. A small problem may be your first login to the NAS because Synology didn’t clarify that the username is an admin without a password.
The DSM is most reminiscent of the Windows GUI. There’s a desktop with icons. The menu is in the upper left corner while the selected item opens a window or widget. Like the Windows OS, we can open multiple windows, minimize or enlarge them, move them as desired, etc.

It would help if you opened the Package Center to download additional applications. All applications you download are free and are divided into two main groups: Synology and Third Party. The app has a huge number, so do a little research on which ones you need. All applications are sorted into packages: multimedia, file management, productivity, data protection, etc.

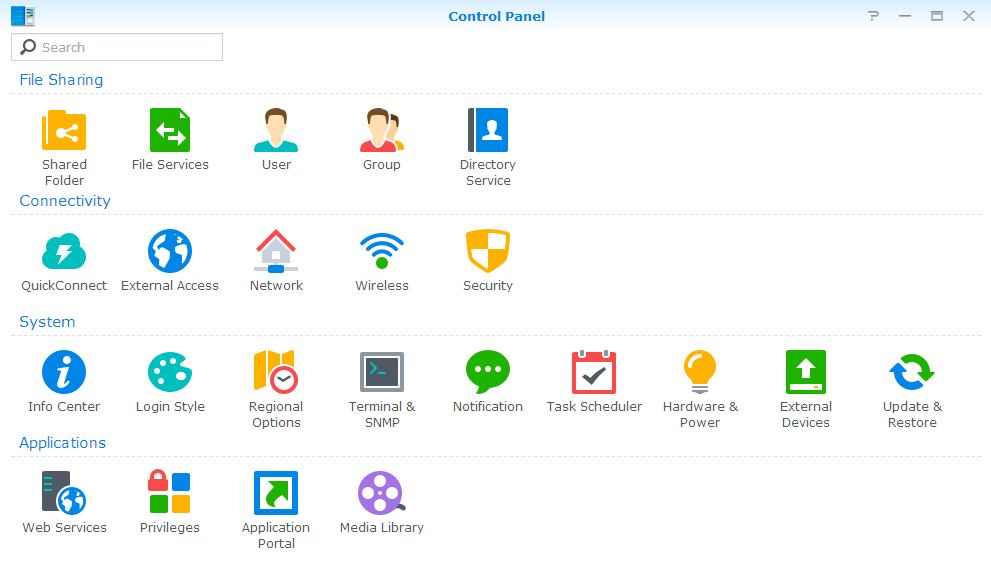
The Control Panel has a lot of options. Here we configure shared files, connections, system settings, and applications.
Storage Manager
Your first step will be to prepare the discs for work, so go to the DSM Menu and select Storage Manager. For physical installation, always choose two identical disks for RAID 1 mode.

For testing, I used two 8TB Seagate IronWolf NAS drives. You will get a RAID 1 array ready to work in a relatively simple way and a few steps. The measured sequential read and write speed was 107 MB/s. The transfer of 29GB file (video) took place at an average speed of 112 MB/s, while DS220 + copied a 30GB folder with 15000 small files (images) at a speed of 81 MB/s to a computer on the local network.
Other options on the menu include File Station, which allows you to create files but view the contents of disks. We use USB Copy when we want to copy the contents of USB memory devices to disks. For this purpose, you can use the already mentioned USB Copy button on the DS220+ case.
DS Finder
Use the DS Finder app to access DS220+ via your mobile phone. The app gives you information about various NAS settings, but you cannot access the content. Each multimedia content requires a separate application. For example, you need the Drive app to watch videos, view pictures – the Photos app, listen to music – the DS Audio app, etc. This way, DS Finder is optimized and unloaded, and you subsequently install only those needed apps.

Conclusion
The DS220+ is ideal for more demanding home users and small offices who want a compact NAS solution for storing important data. You can store all multimedia content and backups from computers or mobile phones safely. Of course, Synology also recommends DS220+ for storing important business data (with RAM upgrades).
Unfortunately, the device’s price isn’t tiny, and you have to add the cost of purchasing (hard) discs to that price. However, you get a reliable NAS with excellent performance. You can upgrade 2GB of RAM to 6GB and expand the total storage capacity to 108 TB, which raises the usability of the DS220 + to a higher level. In any case, I warmly recommend purchasing this NAS to anyone who cares about its data.